Learn three words first. The working end is the end you move. The standing part is the rest of the rope. A bight is a U-shaped bend in the rope. Every knot is just those three moving in a set order.
Camp and wildlife · Camp and wildlife course
Five knots that do most jobs
A rope is only useful once you can tie it to something. Five knots cover almost everything at camp: the square knotsquare knot A flat knot that joins two ropes of the same thickness: right over left, then left over right. joins two ropes, the clove hitchclove hitch A quick knot that ties a rope to a pole or tree. It looks like an X on the front. grabs a polepoles Dead, straight sticks about as thick as your wrist and 2 to 3 meters long. Dead standing wood is best: dry, and it snaps clean., the bowlinebowline A knot that makes a fixed loop at the end of a rope. It does not slip or jam, and it unties easily after a load. makes a loop that will not slip, two half hitchestwo half hitches A simple way to tie a rope to a post or tree: two wraps of the free end around the rope itself. tie a line to a tree, and the taut-line hitchtaut-line hitch A loop knot that slides to tighten or loosen a tent or tarp line, then stays where you leave it. makes a loop you can slide to tighten a tent line.
Why this matters
Almost every camp job needs a rope tied to something: a tarp line, a food hang, a shelter frame, a slingsling A throwing tool: a pouch with two cords. Swing it and let go of one cord to fling a stone. for a hurt arm. A wrong knot slips when you need it most, or jams so tight you have to cut your only rope.
You do not need fifty knots. The Army's mountaineering course and its cold-weather handbook teach the same short list, because a few knots tied well beat many tied badly.
What you need
- A piece of rope or cord about as long as you are tall. Paracord or a shoelace works for practice.
- A broom handle, a chair leg or a tree for the hitches.
About 10 minutes to learn each knot, and a few minutes a day for a week to make it stick.
Step by step
Square knot, to join two ropes of the same thickness: right over left and under, then left over right and under. Both ends come out on the same side. If they come out on opposite sides it is a granny knotgranny knot A square knot tied the wrong way (right over left twice). It looks close but can slip or jam., which slips. Tie a half hitch on each side to lock it, and never trust it to hold a heavy load.
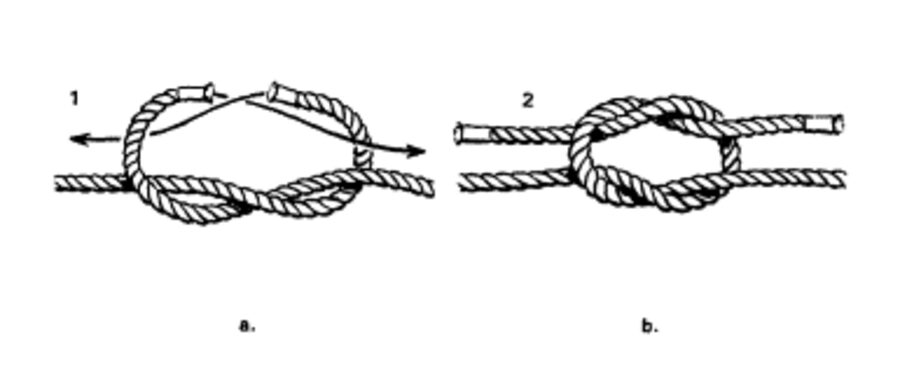
A square knot: both ends come out on the same side Clove hitch, to tie a rope to a pole or tree: wrap the working end around the pole, cross over the standing part, wrap around again and tuck the end under that last wrap. It looks like an X on the front. It holds while it stays tight and starts and ends most lashings.
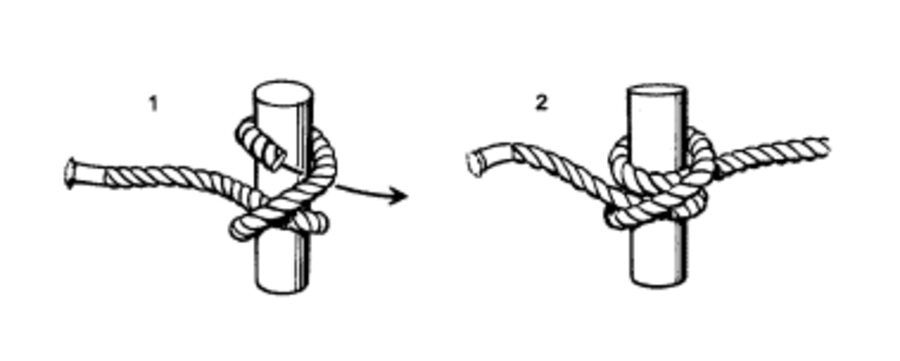
A clove hitch around a post Bowline, a loop that will not slip or jam: make a small overhand loop in the standing part. Bring the working end up through it, around behind the standing part, and back down through the small loop. "The rabbit comes out of the hole, around the tree, and back down the hole." Pull the standing part to set it. Leave a tail at least a hand wide.
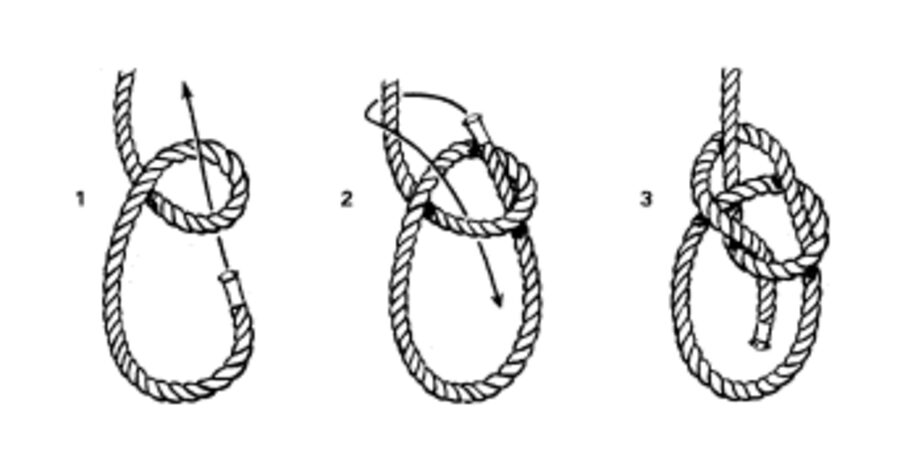
A bowline: up through the hole, around the tree, back down Two half hitches, to tie a line to a tree or post: go around the tree, then wrap the working end around the standing part and through itself twice in the same direction. Add a full extra turn around the tree first (a round turn) and it holds a steady pull even better.
Taut-line hitch, a loop you can slide to tighten or loosen a tent or tarp line: go around the stake, then wrap the working end twice around the standing part inside the loop, working toward the stake. Finish with one more wrap outside the loop. Slide the knot up to tighten; it stays where you leave it.
Dress and set every knot: line up the wraps so none cross, then pull each strand tight. A sloppy knot slips even if you tied the right one. Test it with a hard pull before you trust it.
Practice until your hands know it. Tie each knot five times with your eyes open, then five times with your eyes closed, then with cold or gloved hands. In a real emergency you will be tired, cold and maybe in the dark.
Tips from survival instructors
- Learn each knot until you can tie it in the dark. You will often need knots when it is cold, wet or dark.
- A bowline is easy to untie even after a heavy load, which is why it is the go-to loop for tarps and ridgelines.
Common mistakes
- Tying a granny knot instead of a square knot. The fix: check that both ends come out on the same side.
- Leaving tails too short. The fix: leave at least a hand's width of tail past every knot.
- Trusting a square knot with a heavy load or a person. The fix: use a bowline for loops that must hold.
- Not dressing the knot. The fix: line up the wraps and pull every strand tight before you load it.
Practice it safely
Keep a short cord by the TV or in the car and tie each knot during commercials or while waiting. When you can tie all five without looking, practice them on a real tarp in the backyard.
Quick check
You need a loop around a person's waist that will not tighten or slip. Which knot?
- Clove hitch
- Bowline
- Square knot
Show the answer
Bowline
Take the quiz and earn the badge
The app checks your answers, keeps your place in the Camp and wildlife, and works with no signal once saved.
Before you rely on thisA learning tool, not a replacement for training. In an emergency, call 911.